by Nick-Admin | Apr 14, 2021 | Roof Replacement, Uncategorized
So you’re getting a new roof, huh? That’s great! But what exactly is involved in the process? Knowing what to expect from a new roof installation can give you peace of mind that you’re receiving the best quality protection for your home. Here’s a look at the process of installing a new roof, step by step. The more you know, the better you’ll feel about your investment.
Roof Installation Step 1: Deciding on a Contractor and Materials
Yes, you’ve made the big decision to get a new roof, but there are still a couple of important decisions you’ll need to make next.
First, you’ll need to decide on a roofing company. Ask around for references, collect a few estimates, compare services and warranties (not just price!), and choose the one that best fits your needs.
Then, discuss your material options with the contractor you choose, and decide on the color, style and type of shingle that works and looks best with your house.
Roof Installation Step 2: Removing Old Roofing
As the saying goes, “Out with the old and in with the new!” In most cases, your old shingles will be removed before your new roof can be installed. Your surrounding landscape will need to be protected with tarps and the neighbors will have to excuse the dumpster in your yard, as it will be needed to collect all the old debris.
Once the old shingles are removed, the roofers will be able to inspect the decking beneath and replace any damaged areas with new decking to ensure a solid foundation.
Roof Installation Step 3: Defending Against Water Damage
A non-corrosive metal, called a drip edge, will be secured along the edges of the roof to prevent moisture from building up and getting underneath your new shingles.
Next, underlayment and flashing will be installed, serving as a waterproofing barrier between decking and shingles and reinforcing roof valleys for extra protection. All vents, pipes, and chimneys will be sealed to ensure no water can penetrate these vulnerable sections of your roof.
Roof Installation Step 4: Installing New Shingles
Woo-hoo! Now your house is ready to get its new roof. It’s time to apply the new shingles you chose in step 1. How long it takes depends on several factors including the size of your house, the type of shingle you choose, the complexity of your roofline, and of course, the weather. Typically, though, you can expect the placement of new shingles to take anywhere from a day or two, all the way up to a full week.
Roof Installation Step 5: Cleanup and Final Inspection
After the last shingle is placed, but before you celebrate a job well done, it’s time to clean up all remaining materials, tools, nails, and equipment, so you can say, “Ta-Da! Look at how awesome our house looks!”
Once it’s cleaned up and looking great, your roofing company will want to make sure your roof functions great, too. A thorough inspection is the final step in new roof installation to ensure standards of quality have been met and your new roof works as good as it looks.
Roof Installation Experts
If you’re considering a new roof for your new home, or you’re ready to replace your roof, reach out to the expert team at Werner Roofing. As a trusted source with years of experience, you can rest assured you’ll receive the best quality roof for your investment. Contact us for a free installation quote and we’ll be happy to come out and help you protect your home for many years to come.
OUR FREE ROOF INSPECTION
How do you know when it’s time for a new roof? The only way to be sure of your residential roof’s current condition is to have a licensed professional personally inspect it. Werner Roofing is proud to offer free roof inspections for every client, so you can be sure of your roof’s condition. Every Werner Roofing inspection comes complete with our promise: “We won’t recommend or sell a roof replacement unless it’s necessary.”
by Nick-Admin | Mar 10, 2021 | Roof Repair, Uncategorized
We get our fair share of storms and windy weather around here, and that can certainly take its toll on your house. Walk outside after such an event, and you’ll typically notice tons of fallen branches strewn across your lawn, but here’s a tip: don’t just look down at the ground, look up at your roof!
Wind and harsh weather can do a number on your shingles, causing them to come loose or even go missing completely. So, what do you do? Well, unless you want more damage to occur, you’re going to have to replace roof shingles that end up casualties of a storm. Don’t worry, though. Just take these steps to ensure your roof is ready for the next big gust of wind.
Step 1: Assess Damaged Roof Shingles
The first thing you should do is decide if this is DIY territory or if you should call in the pros. If there is quite a bit of damage, you don’t have the tools or materials to do a good job, or you just plain don’t like the idea of climbing on your roof, ask professional roofers for help — hey, it’s what we do!
Besides, it’s often unsafe to repair shingles on your own. Professionals can repair loose or missing shingles quickly and properly, likely saving you money and further hassles in the long run.
On the other hand, if you do consider yourself handy or we’re talking just one or two shingles that you’re confident you can fix yourself, go ahead and move on to step two.
Step 2: Gather Materials to Replace Roof Shingles
Here’s what you need to replace loose or missing shingles safely (you know, besides a ladder, sturdy shoes, and safety gear):
- Hammer
- Pry Bar
- Roofing Nails
- Shingle Sealant
- Replacement Shingles — did the builder or the previous homeowner leave any leftover shingles behind? If not, head to a home center to find the same type of shingles that match up in color and size. You can grab the other materials you need as well if you don’t have them already handy at home.
Step 3: Repair Roof Shingles – Remove, Replace, Rejoice!
Pick a day that the weather is just right. If it’s too cold, the shingles can crack or break; too hot and the sealant bond between the shingles will be difficult to get apart. Once you’re on your roof safely, clear any debris from the storm. Now you’re ready to replace the roof shingles that are loose or missing.
How to Remove a Loose Shingle
- Slide your pry bar under the shingle directly above the damaged one and gently lift up until it is free from the sealant. This will expose the first row of nails.
- Slip the pry bar under the damaged shingle and lift upward. The nails still intact should start to pop up a bit.
- Remove the pry bar and press down on the shingle so you can pull out the popped-up nails completely.
- Repeat the procedure on the shingle above to remove whatever is still remaining of the second set of nails.
- Pull out the damaged shingle.
How to Replace a Loose or Missing Shingle
- Slide the new shingle into place.
- Lift each of the new shingle’s tabs and apply sealant under each, then press down flat.
- Nail into place according to how it was nailed before.
- Seal and renail the overlying shingle above it.
Time to Rejoice
You did it! You have officially readied your roof for whatever Mother Nature has in store next. Pat yourself on the back (once you’re on the ground) and give your neighbor a “Yeah, that’s right, I fixed my own roof” kind of nod, then go ahead and celebrate however you like before the wind kicks up again.
Werner Roofing to the Rescue!
If you notice roof damage, it’s best to take care of it quickly before it gets worse, or more expensive to fix! If you’re not the DIY type or simply feel better knowing professionals are addressing the problems with your roof, contact Werner Roofing today. Our expert roofers are here to help inspect and resolve roofing damage before it causes problems for your home. Just give us a call at 616-844-5382 and we’ll be happy to come out and help.
OUR FREE ROOF INSPECTION
How do you know when it’s time for a new roof? The only way to be sure of your residential roof’s current condition is to have a licensed professional personally inspect it. Werner Roofing is proud to offer free roof inspections for every client, so you can be sure of your roof’s condition. Every Werner Roofing inspection comes complete with our promise: “We won’t recommend or sell a roof replacement unless it’s necessary.”
by Werner-Admin | Nov 6, 2020 | Uncategorized
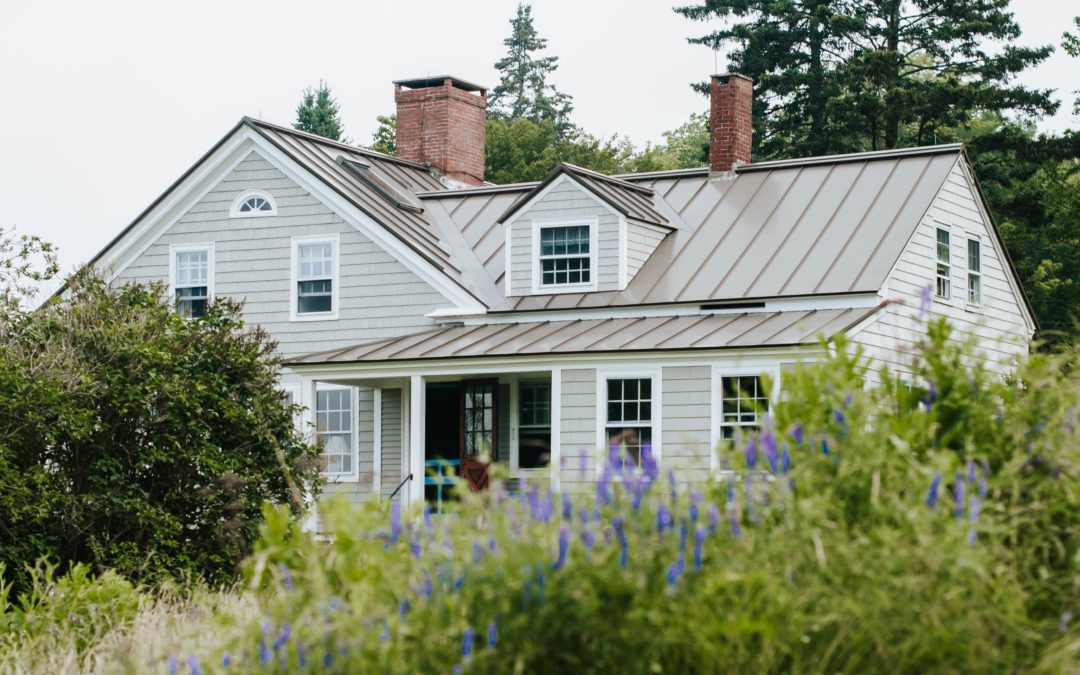
Standing seam metal roofs are one of the most high quality roofing systems you can choose for your home. Metal roofs are known for offering superior protection and durability, all tied together in a sustainable and cost effective package. What’s a standing seam metal roof, and how could it benefit your home? Let’s talk about this popular roofing system and a few of the advantages it offers.
What is a Standing Seam Metal Roof?
A standing seam metal roof consists of a flat metal panel running from the ridge of the roof to the eaves that are connected to other panels with secure fasteners. The standing seam — typically one or two inches above the panel — is what conceals the fasteners. The standing seam protects the connection between the panels from weather better than a traditional metal roof. It also facilitates water runoff and thermal movement, and reduces debris buildup, including sticks, leaves, and snow.
Benefits of a Standing Seam Metal Roof
A standing seam metal roof is a durable weatherproof shield that protects your home against wind, rain, hail, and other weather events. There are many benefits of a metal roof for your home, but a few of the most notable are sustainability, easy maintenance, durability, and overall value.
Sustainability
Standing seam metal roofs are one of the most sustainable roofing choices on the market. They can be made from up to 95% post-consumer recycled aluminum, and when your roof eventually needs to be replaced, the materials can be completely recycled.
Metal roofs are also more energy-efficient than asphalt shingles or other roof types. They keep your home cooler during the summer by reflecting the sun’s heat away from your home. Asphalt roofs, on the other hand, absorb heat year-round, which insulates your home during the winter, but makes your air conditioning work harder to cool your home when it’s warm out.
Simple Maintenance
Metal roofs are much easier to maintain than traditional asphalt roofs. The roofing panel design collects less dirt and debris than traditional roofs. When they do need cleaning the dirt can easily be removed with soap and water. If you don’t want to clean your metal roof yourself, you can have it done by a professional, so you can avoid injury and possible damage to your roof.
Extreme Durability
Metal roofs are known for their superior protective capabilities and durability. They can last up to 70 years before they need replacing, compared to the maximum 20 years of an asphalt shingle roof. They also offer greater wind and impact resistance than traditional roof types, so you don’t have to worry about repairing damage or replacing shingles every time the wind picks up. Even if a tree branch falls on your metal roof it’s unlikely to cause serious damage like cracks or holes — at most a dent may appear, but the damage will only be cosmetic. Your roof’s integrity will be preserved and it will continue to protect your home and your family.
Lifetime Value
Standing seam metal roofs are also becoming more popular with homeowners because of the rising cost of oil, which causes a similar rise in the price of asphalt shingles. Homeowners are comparing the costs of the materials, labor, and maintenance of roofing options and seeing the true value of a metal roof for their home.
Metal roofs last longer than asphalt shingle roofs, and therefore have a greater lifetime value. A durable standing seam metal roof increases your home’s value and costs less to maintain than traditional shingle roofs. Although it requires a larger initial investment, the payoff of a standing seam metal roof comes from the overall value of the roof and the superior protection it can offer your home.
Customizing Your Standing Seam Metal Roof
A standing seam metal roof offers a unique roofing option. With a metal roof, your home is likely to stand out from others in your neighborhood, and can customize the shade to complement your home’s design. If you’re not sure which color to choose, try out different options using an online visualizer tool or talk to a metal roof expert. Whatever color you choose, a standing seam metal roof will serve you well — both aesthetically and practically — and it will continue to protect your home and your property value over time.
Is a standing seam roof right for you? Let us know! If you’re interested in installing a standing seam metal roof on your home, the Werner Roofing team can certainly help.

by Werner-Admin | Oct 23, 2020 | Uncategorized
What all goes into that final price you see for your roof repair. How much insurance pays in, how much you’re paying for labor, how much you’re paying for materials and time, etc. Remember that it’s always cheaper to have a roof repaired sooner rather than later.
If your roof has sustained damage or has a leak, it’s important to get it checked by a professional as soon as possible. Small leaks or weaknesses in your roof can quickly become large problems if water gets in or a storm damages your roof. If left unaddressed, the cost of roof repair can skyrocket and may not be covered by your roof’s warranty or insurance. Repairing your roof early can help prevent this from happening, and it can also lower the cost of your roof repair.
Cost of Roof Repair Breakdown
When you see the cost of roof repair, it generally includes both the roofing supplies and the labor and time it takes to complete the job. Let’s breakdown these elements and see how much it affects your total.
Supplies Cost of Roof Repair
When you get your roof fixed after a storm or to address regular wear, a large part of the cost of roof repair is the price of the materials used to fix your roof. This not only includes the visible elements you see, such as shingles or tiles, but also the accessories used to waterproof and protect your roof deck, cover ridges and vents, and other roof details. The materials themselves vary in cost, and the amount you spend on each will depend on the amount of damage and the area that needs to be replaced. Here are a few average costs for common roofing materials:
- Asphalt Shingles: $5-10 per square foot; The least expensive shingles are 3-tab, while architectural and dimensional shingles will cost more to repair. Asphalt shingle prices vary as the price of oil used to make them fluctuates.
- Cedar or Wood Shingles: more expensive than asphalt shingles, but the cost will depend on the kind of wood, the availability of the materials in your area, and the specialized installation needed to attach them.
- Metal Roofs: $5-15 per square foot; Metal roofs are typically more durable than asphalt or wood shingles, and occasional damage such as repairing seams or dents is generally cosmetic only and will not damage the integrity of your roof.
Labor Cost of Roof Repair
Hourly labor factors into the cost of roof repair, and can vary depending on the typical hourly rates for contractors in your area, the extent of the damage to your roof, the number of workers required to repair your roof, and the amount of time it takes to repair your roof. The national average pay for a roofer is $75 per hour, but depending on where you live this can range between $25-$100 an hour.
Estimating Insurance for the Cost of Roof Repair
If your roof was damaged and you make a claim to your insurance company, you may be reimbursed for part or all of the cost of roof repair. However, the insurance coverage will vary from roof to roof, depending on several factors such as your roof’s age and size and the extent of the damage. Your roof’s warranty may help cover areas your insurance won’t. Let’s break this down a bit further.
Age of Roof
It’s possible the age of your roof will determine what your insurance policy will reimburse you for the cost of roof repair and what repairs can be covered. Depreciating values of your roof can impact the reimbursement level. Most policies cover events of natural disasters and weather, vandalism, and fire damage. However, long term leaks are typically not covered, so regularly check your roof for damage and address problems right away. Regular roof wear and weathering can decrease your roof’s ability to protect your home over time, but is also not covered by most insurance plans.
Size of Roof
The size, pitch, and complexity of your roof’s design can affect the cost of roof repair. If your insurance offers a flat rate of reimbursement to cover roof repairs, your roof may not be fully covered if it needs special accommodations or materials to repair it properly. A complex roof design with dormers, valleys, and a steeper pitch will require more labor and materials than a straightforward roof design, and therefore will be more expensive to repair.
Roof Warranty
The reason your roof needs repair is going to determine how your costs are covered, either by your insurance or your roof’s warranty. Insurance will cover events of extreme weather, fire, or vandalism, while generally, manufacturing defects or poor installation are not included in insurance plans. Roofing warranties typically only cover defects from the manufacturer that cause the roof to break down sooner than it should, and usually last about 20-50 years.
Most problems with roofs cannot be traced back to materials, but instead to something that went wrong during the installation. This is why it’s so important to hire a reputable roofing contractor to install and make repairs on your roof. Workmanship warranties are rare, but they can protect you and your roof from problems that arise from improper installation.
Extent of Roof Damage
Your insurance adjuster determines the cause and extent of damage to your roof, and whether it falls under your warranty or your insurance policy. If the cause is determined to be a natural one, the insurance coverage should be proportional to the extent of the damage. If only cosmetic damage is reported by the adjuster, your claim could be denied. As long as damage doesn’t affect the integrity of the roof, the insurance company can have the final say on this subjective criteria.
Ultimately, the best practice is to file a claim with your insurance company and have any problems with your roof resolved as soon as possible. This will ensure that your home continues to be protected by a high-performance roof, and you’ll save money on the cost of roof repair by not letting any damages get worse and more expensive.
Does your roof need a bit of repair? Get in touch with the team at Werner Roofing. We’re happy to offer you a free, no-obligation estimate, so you know exactly how much you’ll have to spend before we even start working.
by Werner-Admin | Oct 16, 2020 | Uncategorized
The way roofs are measured and roofing materials are calculated is not always simple. When trying to estimate the amount of shingles or other roofing supplies, you may have found that your calculations don’t match up with the way roofing companies or suppliers talk about their products. Instead, they may refer to roofing supplies in terms of roofing squares. What is a roofing square and how can we use it to calculate the roofing materials you’ll need? Let’s find out.
What is a Roofing Square?
The term roofing square does not refer to square feet or yards. In fact, it is a unit used to express 100 square feet, in order to simplify the grouping and ordering of roofing materials such as shingles, tiles, or other supplies. Roofing squares are commonly used to calculate the materials needed for roofing projects, so you may hear your roofing contractor or your materials supplier refer to your roof in these terms.
For help calculating the total roofing squares in your home’s roof, some manufacturers offer free roofing square calculators online, or you can have your roof assessed and receive a free quote from a professional roofing company. Or, you can DIY by measuring your roof yourself.
Measuring Roofing Squares
If you need to measure the amount of roofing squares your roof contains, you can do this simply by measuring the total square footage of your roof, and then using that amount to calculate the number of roofing squares it contains. Let’s go over 4 steps to do this safely and effectively.
#1 Prepare
First, make sure you have all the right equipment to get onto your roof and measure it safely. This will include a tape measure, a small notebook and pencil, a sturdy ladder, and a buddy to hold the ladder still and supervise while you’re on your roof. Tread carefully on your roof so you don’t slip or cause damage to your roof.
#2 Measure
To find the square footage of your roof, measure the length and width of each plane of your roof, including the sides of all dormers, into valleys, and all other roof design details that are covered with roofing materials. Find the area of each plane by multiplying the length and width.
#3 Calculate
Add all the area totals together to get the total square footage of your roof.
#4 Convert
To find the number of roofing squares your roof contains, convert the square footage to roofing squares by dividing number you found in Step #3 by 100. For example, if the total square footage of your roof was 1700 square feet, your roof contains 17 roofing squares.
Keep in mind that roofing squares is not the only information you need when estimating the required materials for completing a roof replacement or installation. Roofing pitch also factors into the total amount and cost of materials for your roofing job. The higher the pitch of your roof, the extra materials you’ll need to cover your roof effectively. Also, if your roof has many complicated details like dormers and valleys, it will need more specialized materials to make sure these sensitive areas are reinforced against leaks or damage.
Measuring Roof Pitch
Roofing pitch is described in degrees, relative to a right angle. To calculate your roof pitch, you need to know the rise and the run of your roof.
- The rise refers to the height of your roof, from the top of the wall to the peak of your roof where the planes meet.
- The run is the distance between the roof plate and the point directly underneath the center ridge or roof peak
Once you’ve measured these two elements, you’re ready to calculate your roof pitch.
Finding Roof Slope
We find the roof slope by plugging the rise and the run into the pythagorean theorem, where the slope of your roof, or the rafter length (squared) = the rise (squared) + the run (squared).
For example if the rise of your roof is 6 feet, and the run of your roof is 12 feet, then:
(6×6) + (12×12) = the square root of 180, or about 13.42
This completes our triangle, so we know the length of all sides.
Calculating Roof Pitch
You can find the pitch of your roof by dividing the rise by the run. Using our example that would be 0.5 or 50 percent. If you want to express this percent as an angle, you’ll need to plug the percentage into this equation using a scientific calculator or an online tool:
Pitch angle = arctan(or tan-1) x (pitch percentage)
Using our example: arctan (0.5) = 26.57 degrees
Now that you know how to measure your roof, calculate a roofing square, and find your roof’s slope and pitch, you should have all the information you need to order materials for your roof! It’s always a good idea to check your calculations with a professional roofer and make sure all materials are installed correctly to give your roof the best, longest-lasting protection.
Looking for a bit more roofing information? Whether you’d just like a bit more help figuring out how many roofing squares are in your roof, or you’re interested in a brand new roof, the experts at Werner Roofing would love to help. Give us a call or reach out to our team online with any and all roofing questions.
by Werner-Admin | Oct 7, 2020 | Uncategorized, West Michigan Roofing Blog
If you’ve ever heard of GAF Timberline shingles, it might have been when a local roofing company was raving about some of their favorite products. Known for their high quality, total protection system, great style, and warranty, it’s no wonder that roofers and homeowners love to use GAF Timberline shingles on their roofs. Let’s take a look at 4 reasons why roofers love these products.
#1 GAF Timberline Shingles Are Top Quality
GAF products are known for being top-of-the-line, and the GAF Timberline shingles are no different. As the most respected shingle brand in the country, GAF makes sure its products are the best quality for every project and that all installers are certified in how to use their products correctly. GAF provides ongoing contractor training and certification programs for contractors so homeowners know they will get a product and service they can rely upon for a long time.
GAF Timberline shingles are made of great quality materials that provide excellent protection for your home against the elements. They have better than average durability with added impact and wind resistance to rival other top competitors. GAF Timberline shingles also have a Class A fire rating, making them a great safety feature for your home.
#2 GAF Timberline Shingles Are Part of a Complete System
Roofers love working with GAF products because they fit together seamlessly in a complete system. All of the GAF components work together to provide the best protection for you and your home year after year. Beyond GAF Timberline Shingles, the GAF total protection system includes WeatherWatch leak barriers, ridge caps and DeckArmor roof deck protection, starter strip shingles, attic ventilation vents, and more. When you install three or more items from their protection system, you can qualify for extra protection from enhanced warranties, extending the protection of your roof even longer.
#3 GAF Timberline Shingles Improve Your Home’s Style
Roof is a huge factor of your home’s overall curb appeal. It’s important to have a roof that is in great condition and protective of your home, but also one that adds to your home’s appearance. GAF Timberline shingles are designed to mimic the structural and visual appearance of wood shakes.
The fine details in each of GAF Timberline Shingles make them a great architectural detail for your home’s exterior. GAF has plenty of options for every price range and personal style. Choose neutral patterns and colors that can blend well with your home’s design and others in the neighborhood. Or, choose a shingle design and color to create some pleasant contrast with your siding or trim. Warmer, brighter colors tend to work well for homes in open, sunny areas, where cooler blues or greens work well for homes in shade to help them blend into the natural surroundings.
#4 GAF Timberline Shingles Carry a Great Warranty
GAF Timberline shingles come with one of the best warranties in the industry. If you install GAF Timberline shingles with at least 3 other qualifying accessories such as roof deck protection, ridge cap shingles, ventilation or leak barriers, you can earn the coveted Lifetime Warranty. This means your roof is protected for 10 years on all shingle products and 15 years for wind damage.
Additionally, if your GAF Timberline shingles are installed by GAF Master Elite certified roofing installer, you can unlock the Golden Pledge Warranty, which extends your lifetime protection up to 50 years and includes coverage for the installation process as well as any manufacturer defects that impact your roof’s integrity and quality.
The GAF Master Elite certification essentially guarantees sound work by itself: Contractors who have earned the title can install all GAF products correctly, commit to ongoing professional training with GAF, are licensed and insured, and have a good reputation for workmanship and quality. The enhanced warranty systems that accompany the title should never need to be used, since these contractors are dedicated to delivering the best quality service.
Werner Roofing is a proud Master Elite certified factory roofing installer for GAF Timberline shingles. If you’re interested in their top-of-the-line architectural options, let us know! We’d love to help you get a roof you can trust, made using products we love.