
by elizabeth@evenbound.com | Apr 7, 2025 | Gutter Maintenance, Gutter Systems
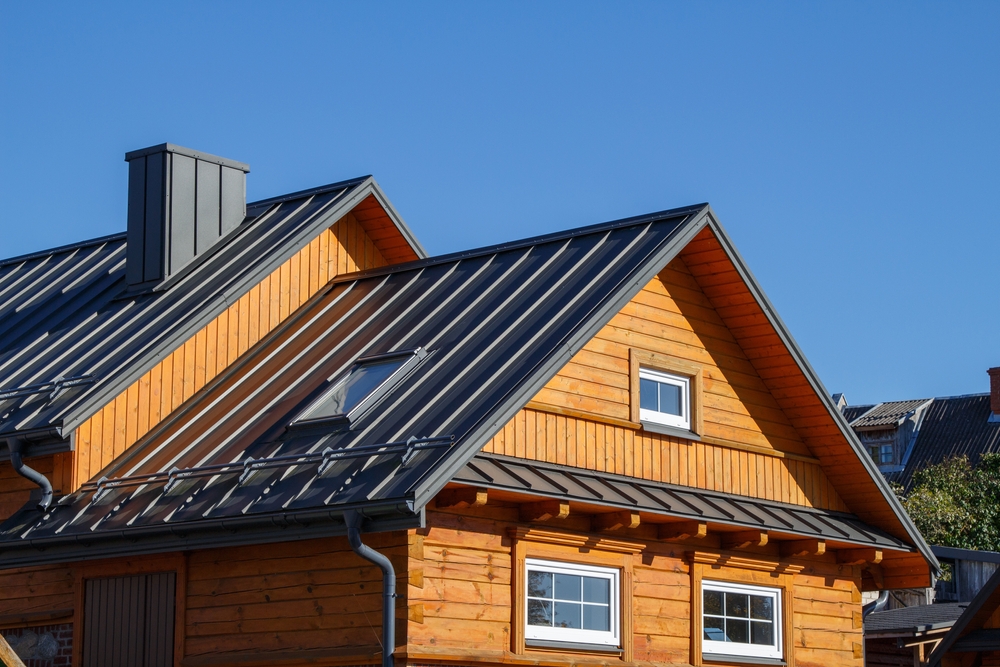
Let’s talk about gutter maintenance. It’s one of those chores no homeowner enjoys. Climbing a ladder to scoop out wet leaves and debris is inconvenient, messy, time-consuming, and dangerous. That’s why so many homeowners ask the same question: Do gutter guards work?
In this blog, we’ll explain everything you need to know about gutter guards, including how they work, their benefits and potential drawbacks, and how to choose the best type for your home. If you’re considering investing in gutter protection, this guide will help you decide.
How Do Gutter Guards Work?
Gutter guards are protective covers that go over gutters to help keep out leaves, twigs, and other debris while still allowing rainwater to flow freely through the system.
So, how do gutter guards work? The concept is simple: By blocking larger debris from entering gutters, they reduce the chance of clogs, backups, and overflow.
There are several types of gutter guards on the market, including:
- Screen and mesh guards – Use a fine metal or plastic mesh to filter out debris.
- Micro-mesh guards – Feature an even finer mesh for more precise filtration.
- Surface tension (or reverse curve) systems – Direct water into the gutter while debris slides off.
- Foam and brush inserts – Sit inside the gutter to block debris while allowing water to pass through.
We install two of the most trusted and effective systems available at Werner Roofing: LeafSlugger Micro and Gutterworks gutter guards. These products are designed to fit seamlessly into your existing gutters and offer long-lasting protection without compromising the look of your home. They’re durable, low-maintenance, and built to perform in West Michigan’s ever-changing weather.
5 Benefits of Gutter Guards
Installing gutter guards offers several advantages for homeowners — especially in areas like West Michigan, where changing seasons and falling leaves can quickly clog up your gutters.
Here are some of the top benefits of gutter guards:
1. Less Frequent Cleaning
Gutter guards significantly reduce the amount of debris that enters your gutters. That means fewer weekend chores and less time spent on a ladder scooping out gunk.
2. Reduced Risk of Clogs and Water Damage
When gutters are clogged, water can overflow and damage your roof, siding, foundation, and landscaping. Gutter guards help keep water flowing properly, protecting your home from costly issues.
3. Protection from Pests Nesting in Gutters
Clogged gutters can become cozy homes for birds, insects, and rodents. Guards help deter unwanted critters by keeping gutters clear and dry.
4. Improved Water Flow and Gutter Longevity
With less debris buildup, your gutters can perform as intended for longer. Gutter guards help prevent sagging, rust, and other issues that shorten a gutter system’s lifespan.
5. Safety: No More Dangerous Ladder Climbing
One of the biggest perks? Staying off the ladder. With gutter guards, you can minimize the need for regular cleanouts and reduce your risk of injury from falls.
Overall, gutter guards are a smart way to protect your home, your time, and your peace of mind.

Are There Drawbacks or Limitations of Gutter Guards?
While gutter guards offer many benefits, they’re not a perfect, one-size-fits-all solution. Here are a few things to consider before deciding if they’re right for your home:
- They Don’t Eliminate Cleaning Altogether
Gutter guards don’t completely eliminate the need for cleaning, but they do make it a whole lot easier and less frequent. Fine materials like pine needles, shingle grit, or pollen may be able to get through and require occasional cleaning.
- Initial Cost
High-quality gutter guards are an investment. Between materials and professional installation, the upfront cost can be higher than regular gutter cleaning — but many homeowners find it pays off in the long run with reduced maintenance and fewer repairs.
- Poor Quality or Improper Installation Can Cause Problems
Not all gutter guards are created equal. Cheap products or improper installation can lead to more issues, like water spilling over the edge, debris piling on top, or even ice dams in winter. That’s why choosing high-quality products and a reputable installer is essential.
What Are the Best Gutter Guards for West Michigan Homes?
With so many options on the market, figuring out which system truly offers the best gutter guards can be challenging. When choosing the right gutter guard, here are a few key factors to consider:
- Tree coverage around your home (more trees = more debris to block)
- Roof type and pitch, which can impact how water flows into your gutters
- Local weather patterns, including snow, ice, and heavy rain
At Werner Roofing, we’ve done the research and hands-on testing to find what works best for our climate and our clients. That’s why we proudly install LeafSlugger Micro and Gutterworks gutter guard systems.
These products are:
- Durable – Built to withstand Michigan’s rain, snow, ice, and wind
- Low-profile – Seamlessly fit into your existing gutters and are virtually invisible from the ground
- Efficient – Designed to handle heavy water flow while keeping out even the most minor debris
- Non-invasive – Installed without disturbing your roof shingles
If you’re looking for reliable, long-lasting protection for your home, these are the systems we trust — and the ones we use ourselves.
The Final Verdict: Are Gutter Guards Worth It?
When weighing the pros and cons, it’s easy to see why so many homeowners install gutter guards. They reduce the time and effort spent on gutter maintenance, help protect your home from water damage, and even make your gutters last longer. While they come with an upfront cost and require occasional cleaning, the long-term benefits often far outweigh the drawbacks.
That said, not all gutter guards are created equal. Choosing a high-quality system and having it installed by a professional makes all the difference in performance, durability, and peace of mind.
At Werner Roofing, we know that gutter guards are a smart investment — especially when you want to protect your home and cut down on year-round upkeep. With trusted products and expert installation tailored to your home’s needs, it’s easy to get lasting results.
Protect Your Home with Professionally Installed Gutter Guards
Ready to stop worrying about clogged gutters and messhttps://wernerroofing.com/contact-us/y cleanouts? Contact Werner Roofing today for a free estimate on gutter guard installation. Our team has the experience, tools, and trusted products — like LeafSlugger Micro and Gutterworks — to help you protect your home with a system that works year-round.
Let us help you find the right solution for your home and install it with the expert care we’re known for across West Michigan.
by elizabeth@evenbound.com | Oct 16, 2024 | Roof Insurance
Filing a roof insurance claim can be stressful, especially if you’re dealing with the aftermath of a storm or other unexpected damage. Many homeowners make common mistakes that can delay their claim or reduce their payout, making the process even more challenging.
Don’t let this happen to you. Read on to discover the top five mistakes homeowners make during the roof insurance claims process and how to avoid them.
Top 5 Mistakes You Can Make When Filing a Roof Damage Insurance Claim
At Werner Roofing, we’re here to help you every step of the way and help you get the compensation you deserve.
1. Failing to Properly Document Damage
Proper documentation is one of the major keys to a successful roof insurance claim. Insurance adjusters need clear evidence of the damage to process the claim accurately, and many homeowners don’t photograph or videotape the damage thoroughly or keep records of the incident that caused it.
To set yourself up for success, take multiple photos and videos from various angles as soon as you notice the damage. Note the date and time of the event and any changes to your home’s exterior, such as leaks or water damage. Be sure to keep any receipts from immediate, temporary repairs you have to make and keep reports and estimates from contractors.
2. Filing a Roof Damage Insurance Claim for a Roof That’s Too Old
Another frequent mistake homeowners make is filing an insurance claim for a roof that’s too old to be covered by insurance. Many policies have age restrictions on roof coverage, especially for roofs over 20 years old. Insurance companies can assess how much wear and tear a roof has gone through and deny your claim if it’s nearing the end of its expected lifespan.
We always recommend checking for any age limitations in your policy before filing a claim. If you think your roof is nearing the end of its life, Werner Roofing can help assess its condition and recommend the best course of action.
3. Choosing the Wrong Roofing Contractor
Don’t hire a contractor who is unfamiliar with the insurance process. This can lead to miscommunication and potential issues with the claim. An experienced roofing contractor can accurately asses the damage, provide adequate documentation, and help you file a legitimate claim.
Always hire a reputable, licensed contractor with experience working with insurance companies. If you don’t have a go-to contractor, ask your neighbors for references or call and vet them yourself. Our roofing professionals help homeowners all across West Michigan navigate insurance claims so you can get the payout you deserve.
4. Not Fully Understanding the Policy Coverage Details
Many homeowners file claims without fully understanding what their insurance policy actually covers. It’s important to note that some policies only cover actual cash value (ACV) rather than replacement cost value (RCV), which can significantly impact the payout amount. Plus, many policies exclude coverage for damage caused by pests or neglect.
To avoid frustration and surprises, review your policy carefully and pay close attention to roof coverage details, deductibles, and exclusions before filing a claim. If something needs to be clarified, ask your insurance provider for an explanation.
5. Asking for a Full Roof Replacement
Some homeowners ask for a full roof replacement when only partial repairs are necessary. It’s possible this doesn’t align with the designated insurance coverage, leading to delays or disputes with the insurance company. Unless the damage is extremely widespread, most insurance companies will be hesitant to approve a full replacement.
Before requesting a complete replacement, have a professional roofing contractor assess the damage to determine if a repair or partial replacement is the best option. Our team can provide a thorough inspection so you can understand what’s necessary.
Trust Werner Roofing to Help Maximize Your Insurance Claim
Navigating the roofing insurance claims process can be tricky, but avoiding these common mistakes will help ensure you receive the correct payout. Werner Roofing is always here to assist you with every step of the process, from inspections to repairs.
If you’re experiencing roof damage, contact Werner Roofing for a free inspection today. We’ll confidently guide you through the insurance process.
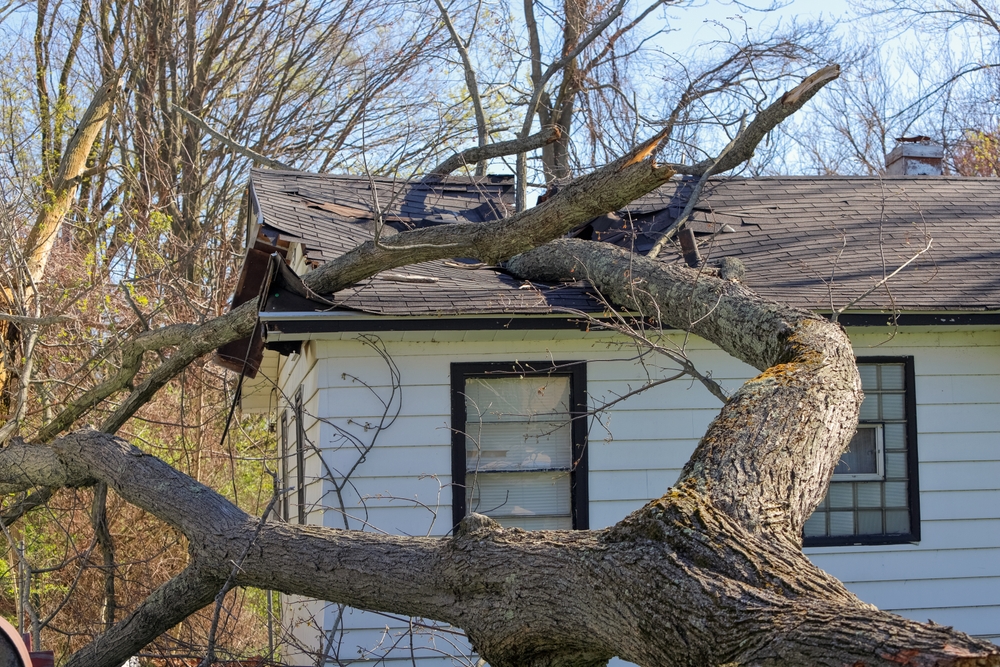
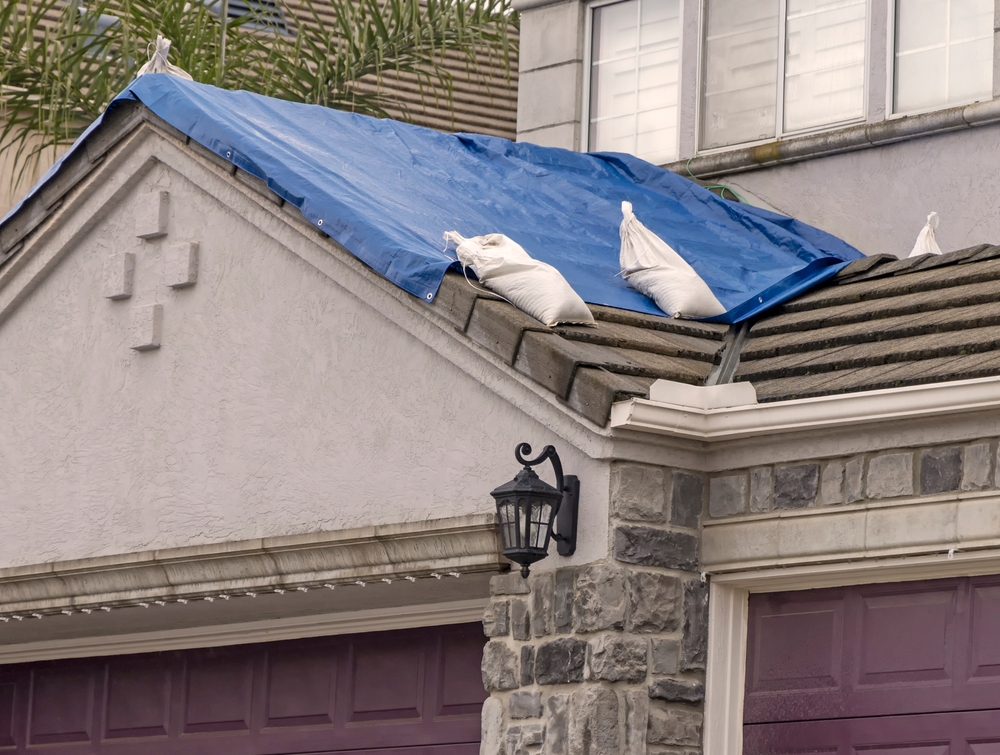
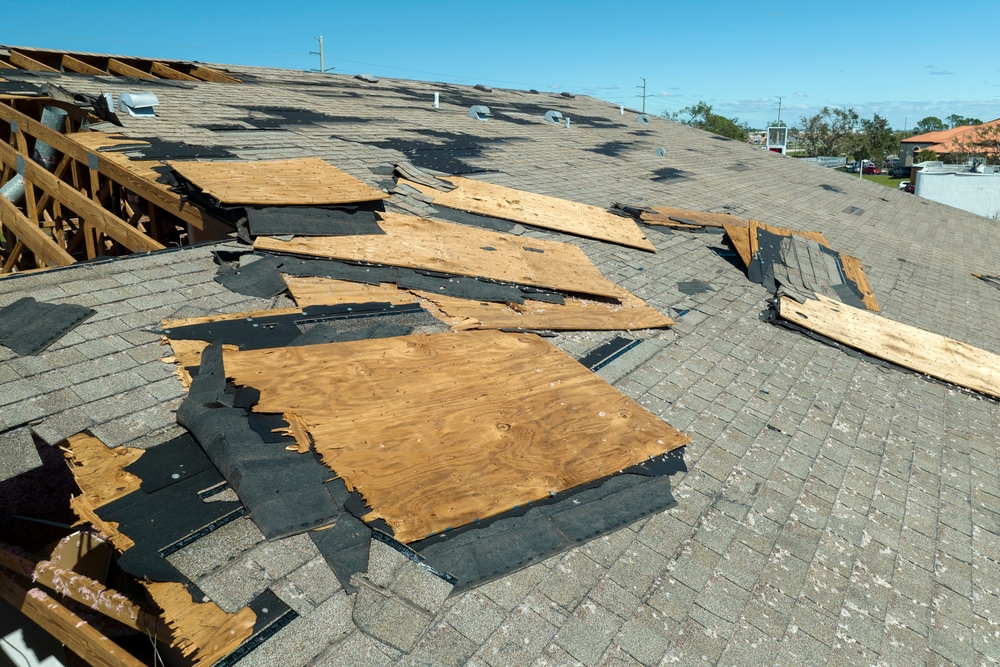
by elizabeth@evenbound.com | Aug 19, 2024 | Roof Damage
Storms can be unpredictable, and, unfortunately, they often leave homeowners dealing with the aftermath of roof damage. Whether it’s missing shingles, sprung a leak, or has severe structural issues, damage to your roof can be devastating. However, taking quick, well-informed steps can make all the difference in protecting your home and ensuring a smooth roof damage insurance claims process.
10 Steps to Take After Your Roof Is Damaged In a Storm
At Werner Roofing, we understand the stress of storm damage and are here to help you every step of the way. We’ll walk you through the essential steps to take if your roof is damaged in a storm so you can confidently navigate the insurance claims process.
1. Ensure Safety First!
Your personal safety should always be the top priority. Remember, no amount of roof damage is worth risking your or your family’s safety.
- Before you inspect the damage, make sure there are no immediate dangers, such as fallen power lines, loose tree branches, or structural instability in your home.
- Stay indoors until you’re certain it’s safe to go outside.
2. Document the Damage
Proper documentation will be vital when filing your roof damage insurance claim.
- Once it’s safe, start documenting the damage as thoroughly as possible. Use your phone or camera to take clear, detailed photos and videos of damage to your roof and property.
- Make sure to capture different angles and include close-ups.
- Don’t forget to note the date and time the storm occurred and the extent of the damage.
3. Understand Your Insurance Policy
Next, it’s time to dive into your homeowner’s insurance policy.
- Familiarize yourself with what is covered and what isn’t. Pay special attention to any specific requirements or limitations related to storm damage.
- Understanding your coverage will help you manage expectations and prepare for the claims process.
4. Report the Damage to Your Insurance Company
The sooner you report the damage to your insurance company, the better.
- Contact your insurance company as soon as possible, providing all the documentation you’ve gathered.
- The faster you start the claims process, the sooner you can get your roof repaired and your home back to normal.
5. Schedule an Inspection with an Insurance Adjuster
After reporting the damage, arrange for an insurance adjuster to come and inspect your roof.
- It’s best to be present during this inspection to answer any questions and ensure the adjuster sees all the documented damage. Your involvement can help avoid any misunderstandings or missed details.
6. Communicate Effectively
Clear communication with your insurance company is key.
- Clearly explain the extent of the damage and any immediate repairs you had to make to prevent further issues.
- Keep the communication lines open, and follow up regularly to ensure the claims process keeps moving forward.
7. Gather Necessary Documentation
Your photos and documentation from earlier will come in handy here, too – providing comprehensive documentation can streamline the process and help ensure your claim is processed smoothly.
- Prepare a detailed list of damages and associated costs to support your claim. This list should include estimates for repairs or replacement from reputable roofing contractors like Werner Roofing.
8. Submit Your Roof Damage Insurance Claim
This step is critical in moving the process forward and getting your roof repaired.
- Complete all the necessary forms and submit your roof damage insurance claim and the required documentation.
- Be sure to keep copies of everything for your records.
9. Choose a Reputable Contractor to Repair Your Roof
Selecting a trustworthy, experienced roofing contractor is crucial to ensuring your roof is repaired correctly.
- Start by researching local roofing contractors and verifying their credentials.
- Look for companies that are licensed, insured, and have a solid reputation in your community.
- Reading reviews, checking ratings with the Better Business Bureau, and asking for references from neighbors can give you insight into the contractor’s reliability and quality of work.
- Werner Roofing’s expertise and commitment to customer satisfaction make us a reliable choice. We understand the importance of quality repairs and stand by our work.
10. Schedule Roof Repairs
Finally, coordinate with your contractor and insurance company to schedule repairs to get your roof back in tip-top shape.
- Make sure all work meets insurance requirements and is completed to your satisfaction.
- With Werner Roofing, you can be confident that your roof will be restored to its best condition, protecting your home for years to come.
Preventative Measures to Keep Your Roof Safe in the Future
Taking proactive steps to safeguard your roof can make all the difference when severe weather strikes. By focusing on regular maintenance and storm preparation, you can ensure your roof is in the best possible condition to withstand whatever the elements may bring.
Regular Maintenance
The best way to protect your roof from future damage is through regular maintenance.
- Routine roof inspections and upkeep can catch small issues before they turn into major problems, saving you time, money, and stress in the long run.
- Clearing debris regularly, checking for loose or damaged shingles, and ensuring your gutters are properly functioning are all critical.
Werner Roofing offers comprehensive maintenance services to keep your roof in shape year-round. Our team will conduct thorough inspections, address any minor repairs, and provide expert advice on how to maintain your roof, helping you prevent future damage and extend the lifespan of your roofing system.
Storm Preparation
Preparing your roof before a storm hits is another crucial step in safeguarding your home.
- Start by securing any loose shingles, clearing your gutters, and trimming overhanging tree branches that could pose a threat during high winds.
- Inspect your roof for any weaknesses, such as small leaks or cracks that could worsen during a storm.
Werner Roofing is here to help with all your storm preparation needs. Our experts can assess your roof’s condition, perform any necessary pre-storm repairs, and offer guidance on additional measures you can take to protect your home.
Trust Werner To Protect Your Home’s Roof
Navigating storm damage and insurance claims can be stressful, but with the proper guidance and a reliable partner, you can restore your roof and peace of mind. Werner Roofing will support you every step of the way, from storm preparation to repairs and everything in between.
Don’t wait—contact Werner Roofing today to keep your roof and home safe and secure, no matter what the weather brings.
by elizabeth@evenbound.com | Jun 17, 2024 | Metal Roofing
Metal roofs have gained popularity recently due to their unique, sleek appearance. However, despite their stunning appearance, several misconceptions surround them, leading to hesitation among potential buyers.
Are metal roofs noisy? Do they attract lightning during thunderstorms? Let’s debunk five common myths about metal roofs and provide accurate information so you can make an informed decision about your next roof.
Let’s Debunk 5 Metal Roof Myths
If you’re considering a new roof or a roof replacement, don’t let outdated myths deter you from exploring the benefits of metal roofing.
Myth 1: Metal Roofs Are Noisy
One of the most common misconceptions about metal roofs is that they are excessively noisy during rain or hailstorms. This belief stems from the old-fashioned tin roofs used in barns and sheds, which can be pretty loud. However, modern metal roofing systems have evolved.
Truth: Modern metal roofs are installed with solid sheathing and insulation that significantly reduces noise. These layers act as sound barriers, absorbing and dampening the sound of rain, hail, and other weather-related noise. When properly installed, metal roofs can be quieter than traditional asphalt shingles.
Myth 2: Metal Roofs Are Susceptible to Rust
Another prevalent myth is that metal roofs are prone to rusting. This misconception likely comes from the image of old, corroded tin roofs. However, modern metal roofing materials are designed to effectively resist rust and corrosion.
Truth: Modern metal roofs are made from materials such as galvanized steel, aluminum, and copper, which have excellent resistance to rust. Let’s take a closer look at these materials:
- Galvanized Steel: This type of steel is coated with a zinc layer, protecting it from corrosion and rust. The galvanization process ensures that the steel remains durable and maintains its appearance over time.
- Aluminum: Aluminum naturally resists corrosion and does not require additional coatings to prevent rust.
- Copper: Copper roofs develop a protective patina over time, preventing corrosion and giving the roof a unique and attractive appearance.
In addition to these rust-resistant materials, modern metal roofs are often treated with protective coatings and finishes. These coatings, such as Kynar 500® and Hylar 5000®, provide an extra layer of protection against the elements, ensuring the roof remains rust-free for decades.
Compared to other roofing materials, metal roofs outperform in terms of longevity and durability. Traditional asphalt shingles, for example, have a typical lifespan of 20 to 30 years, whereas metal roofs can last 50 years or more with minimal maintenance.
Myth 3: Metal Roofs Are Expensive
Many homeowners hesitate to choose metal roofing because they believe it’s too expensive. While the initial cost of a metal roof can be higher than that of some other roofing materials, metal roofs offer long-term savings.
Truth: When evaluating the cost of metal roofs, it’s essential to look beyond the initial price tag and consider the total cost of ownership over the roof’s lifespan. Here’s a breakdown of the factors that contribute to the long-term savings:
- Energy Efficiency: Metal roofs are highly energy-efficient and reflect a significant portion of the sun’s heat, reducing the cooling load on your home and lowering your energy bills.
- Low Maintenance: Metal roofs are resistant to common issues such as mold, mildew, and insect infestations, so they require minimal maintenance compared to other roofing materials.
- Longevity: While traditional asphalt shingles may need to be replaced every 20 to 30 years, metal roofs can last 50 years or more.
Myth 4: Metal Roofs Attract Lightning
A common fear is that metal roofs increase the risk of lightning strikes, making them dangerous during thunderstorms. This myth probably stems from metal’s association with electricity and the assumption that metal roofs might act as lightning magnets.
Truth: To understand why metal roofs do not attract lightning, it’s essential to know how lightning actually functions. Lightning strikes are determined by a combination of factors, including the structure’s height, shape, and isolation, rather than the material it’s made from. Lightning is just as likely to strike a tree, a utility pole, or a traditional shingled roof as it is to strike a metal roof.
If lightning does strike a metal roof, the metal can actually help disperse the electricity safely. Metal is a non-combustible material and can dissipate the electrical charge over a larger area. This can reduce the risk of fire and other damage if lightning strikes a more combustible material like wood.
Myth 5: Metal Roofs Are Not Energy-Efficient
There’s a common belief that metal roofs are poor insulators and can lead to higher energy costs. This misconception likely arises from the assumption that metal, being a good conductor of heat, would make homes hotter in the summer and colder in the winter. However, modern metal roofs are designed to be highly energy-efficient.
Truth: Modern metal roofs are engineered to provide excellent energy efficiency, making them a smart choice for homeowners looking to reduce their energy costs. Here are the key factors that contribute to their efficiency:
- Reflective Properties: Unlike traditional roofing materials that absorb heat, metal roofs reflect a substantial portion of the sun’s rays, reducing the heat that penetrates the roof and enters the home. This keeps homes cooler during the hot summer months.
- Cool Roof Coatings: Many metal roofs have special coatings and finishes designed to enhance energy efficiency. These cool roof coatings are specifically formulated to increase the roof’s reflectivity and thermal emittance.
- Insulation Compatibility: Metal roofs are paired with high-quality insulation and provide excellent thermal performance. When properly insulated, metal roofs can help maintain a consistent indoor temperature, reducing the need for heating and cooling throughout the year.
- Environmental Benefits: Metal roofs are often made from recycled materials and are fully recyclable at the end of their life span.
Considering a New Metal Roof? Werner Roofing Has You Covered
Now that you know the truth about metal roofs, they might be the perfect choice for your home! Contact Werner Roofing today for more information or to get a free quote. Our experienced team is here to help you make an informed decision and ensure your home is protected with a roof that meets your needs and exceeds your expectations.
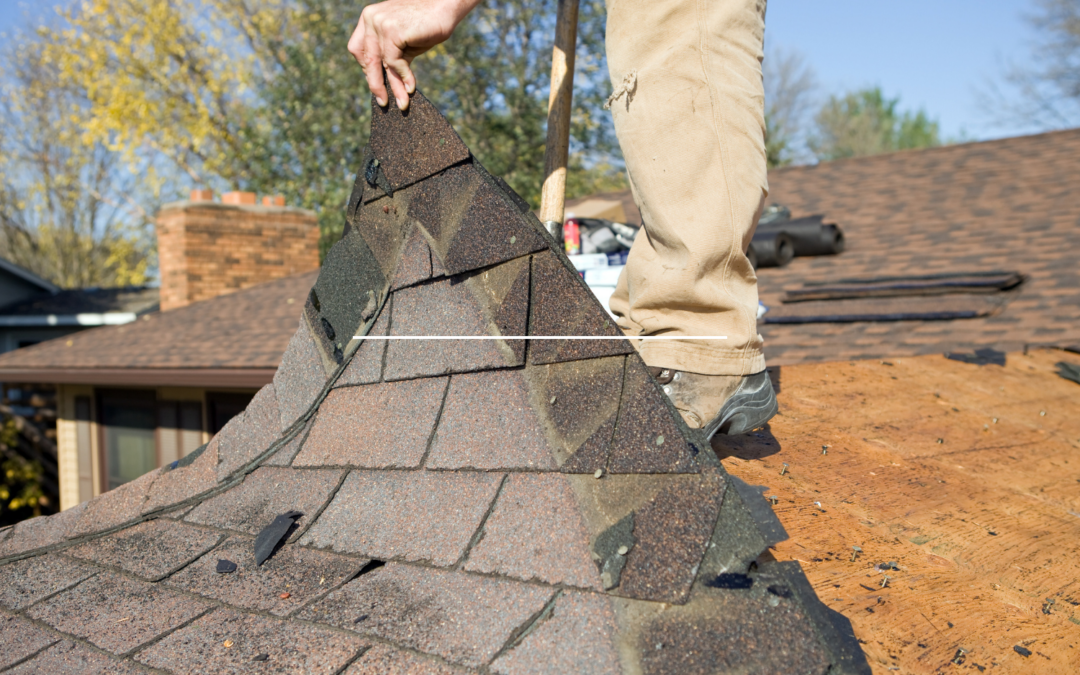
by elizabeth@evenbound.com | Feb 20, 2024 | Gutter Systems
Gutters play a crucial role in your roof’s overall health and longevity. Efficient gutter systems help divert rainwater away from your home’s foundation, preventing water damage, erosion, and potential structural issues.
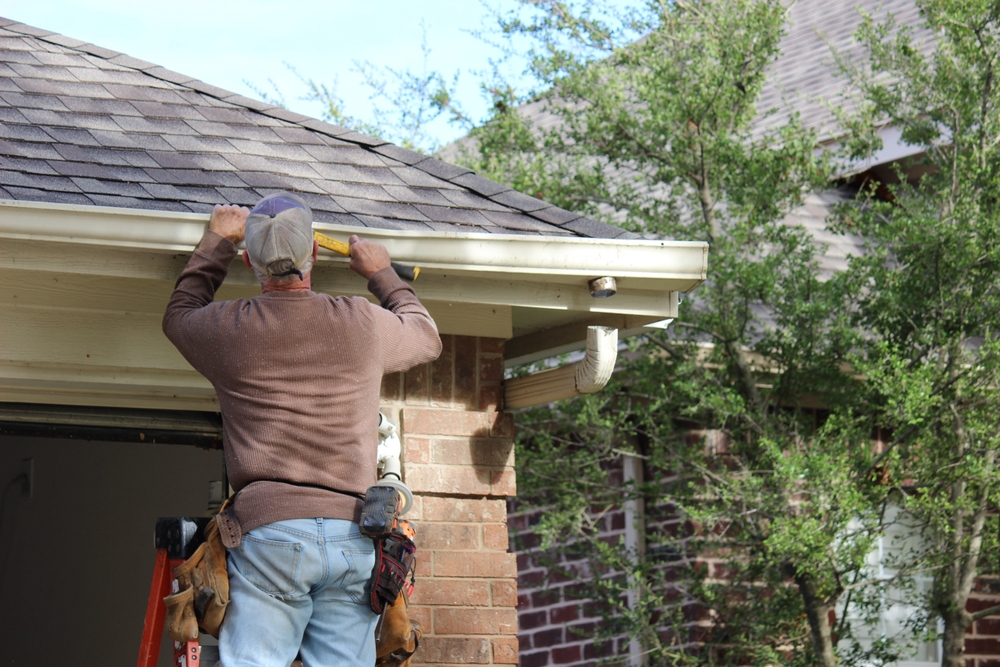
With the rise of the do-it-yourself trend in home improvement projects, many homeowners are tempted to tackle gutter installation themselves. In this blog, we’ll weigh the pros and cons, discuss the step-by-step process of DIY gutter installation, and explore whether or not this route is the way to go.
So, is DIY gutter installation worth it? Let’s find out.
DIY Gutter Installation Step-by-Step:
By following these step-by-step instructions, you can tackle DIY gutter installation with confidence. However, it’s essential to exercise caution and prioritize safety throughout the process. If you’re unsure or uncomfortable with any aspect of the installation, don’t hesitate to seek professional assistance.
1. Gather Necessary Tools and Materials
When tackling a DIY project, having all the necessary tools and materials is crucial. For gutter installation, this includes a ladder, tape measure, level, drill or screwdriver, gutter hangers and brackets, gutter sections, downspouts, outlets, sealant, and safety gear like gloves and goggles.
2. Measure and Plan Gutter Placement
Measure twice, cut once– this age-old advice holds true regarding gutter installation. Take precise measurements of your roofline to determine the required length of gutter sections and downspouts. Carefully plan the placement of gutters to ensure optimal water flow and drainage away from your home’s foundation.
3. Install Gutter Hangers and Brackets
Proper support is essential for the stability and longevity of your gutter system. Install gutter hangers and brackets along the fascia board at even intervals, ensuring they’re securely anchored and level.
4. Attach Gutter Sections and Corners
With the hangers in place, it’s time to attach the gutter sections and corners. Fit the sections together using connectors or screws to secure them in place. Pay close attention to alignment and make sure there’s a seamless connection between sections.
5. Secure Downspouts and Outlets
Downspouts are essential to gutter installation; they direct water away from your home. Secure them to the side of your house, ensuring they’re angled downward for proper drainage. Install outlets where necessary to connect downspouts to the gutter system.
6. Check for Proper Slope and Alignment
Once the gutters are in place, double-check for proper slope and alignment. Gutters should be sloped slightly towards the downspouts to facilitate water flow. Use a level to ensure they’re evenly aligned along the roofline.
7. Seal Seams and Connections
To prevent leaks and ensure a watertight seal, seal the seams and connections with a high-quality gutter sealant. Apply sealant generously around joints, corners, and other areas where water can penetrate.
Tips for DIY Gutter Installation:
We encourage you to take these tips to heart to enhance your safety, accuracy, and efficiency throughout your DIY gutter installation project. However, if you encounter challenges or feel uncertain about any aspect of the process, don’t hesitate to consult with a professional roofing company like Werner Roofing for expert assistance.
- Safety should always be your top priority when undertaking DIY gutter installation. Before starting any work, make sure your ladder is sturdy and positioned on level ground. Use proper safety gear, including gloves and goggles, to protect yourself from sharp edges and debris. Exercise caution when working at heights, and never attempt to install gutters alone.
- The success of your gutter installation project hinges on accurate measurements and meticulous planning. Take the time to measure your roofline carefully and plan the placement of gutters and downspouts accordingly. Consider factors such as the slope of your roof, the direction of water flow, and the location of obstacles like trees and vents.
- Weather conditions can significantly impact the success of your gutter installation project. It’s ideal to choose a dry, mild day to tackle the installation since rain or extreme temperatures can hinder progress and compromise the integrity of the gutters. Avoid working in windy conditions, as gusts can make handling materials and climbing ladders hazardous.
Common Mistakes of DIY Gutter Installation:
By being mindful of these common mistakes and taking proactive measures to avoid them, you can ensure a successful and trouble-free gutter installation project. If you’re unsure about any aspect of the process, there’s no shame in leaving it to the professionals.
- One of the most common mistakes in DIY gutter installation is failing to achieve the correct slope and alignment. Gutters should be installed with a slight downward slope towards the downspouts for proper water drainage. Improper slope or alignment can lead to water pooling, overflow, and potential damage to your home’s foundation or landscaping.
- Inadequately securing gutter hangers and brackets can lead to sagging gutters, improper water flow, and potential damage to your home’s exterior. Ensure that hangers and brackets are securely anchored to the fascia board at regular intervals and that they’re level and aligned correctly.
- Sealing seams and connections prevents leaks and ensures a watertight gutter system. Neglecting to seal seams and connections can result in water infiltration, water damage to your home’s interior, and mold growth.
- DIYers often overlook local building codes and regulations when installing gutters, leading to compliance issues and potential fines. Before starting your project, familiarize yourself with local requirements regarding gutter installation, including setbacks, materials, and drainage regulations.
- Working at heights, handling heavy materials, and using power tools pose potential safety hazards. Always prioritize safety by using proper equipment, following safety guidelines, and knowing your limits. If you’re uncomfortable or unsure about any aspect of the installation process, it’s best to seek professional assistance to avoid accidents or injury.
The Benefits of Hiring Professional Roofing Companies:
Overall, the benefits of hiring a professional roofing company for gutter installation far outweigh the risks and uncertainties associated with DIY approaches. From expertise and efficiency to long-term performance and peace of mind, experienced roofers offer invaluable services.
- Expertise and Experience – Professional roofing companies bring years of knowledge and experience. Their teams of skilled technicians are well-trained in the latest industry standards, techniques, and best practices for gutter installation.
- Time and Cost Efficiency – While DIY gutter installation may seem cost-effective at first glance, it often becomes more time-consuming and costly in the long run. Professional roofing companies have the resources and tools to complete gutter installation projects efficiently and promptly.
- Assurance of Proper Installation and Long-Term Performance – Professional roofers have the expertise to assess your home’s unique requirements and recommend the most suitable gutter system. You can enjoy peace of mind knowing that your gutters will function optimally and protect your home from water damage for years to come.
- Warranty Coverage – If there are any issues or defects with your gutter system, reputable roofing companies like Werner Roofing will stand behind their work and address any concerns promptly and effectively. With warranty coverage, you can rest easy knowing your investment is safeguarded.
Trust Werner Roofing for Your Gutter and Roofing Needs
When considering gutter and roofing needs, we encourage readers to turn to our team at Werner Roofing. We’re a trusted name in the industry known for our commitment to excellence and customer satisfaction. With skilled professionals and a dedication to quality craftsmanship, we provide comprehensive gutter and roofing solutions tailored to each homeowner’s needs and preferences.
Don’t take chances with DIY gutter installation. Contact Werner Roofing – we’re happy to help!